Smart Ways to Digitize and Organize Study Materials
Learn how to digitize study materials, convert notes into Word files, organize them with folders, and keep your study resources safely backed up.
Picture this: It’s the night before your final exam, and you remember a perfect note with the most important things to prepare. But it’s in a notebook you left at your friend’s house.
Or you took a photo of the whiteboard after the class, only to realize four weeks later that it’s buried somewhere among 300 pictures of your cat.
If any of that sounds familiar, it’s time to digitize and organize your study materials properly. The good news? You don’t need a high-quality scanner, very expensive software, or hours of free time.
A smartphone, an active internet connection, and a simple workflow are all you need!
Why Bother Digitizing and Organizing Your Study Materials?
Before jumping into the “how,” first understand what’s actually in it for you. Here’s why digitizing and organizing important study materials can help:
You'll never lose notes again. Paper can get lost, torn, or spilled on. A digital copy saved properly can survive all of that. Although a digital copy can be subject to security risks, it is less vulnerable to physical damage or loss.
Everything becomes easier to find. When your files are organized cleanly, you can find even something as hard as “the Krebs cycle diagram” in seconds.
Your notes go where you go. You can review notes on the bus and read lectures on your tablet. You carry everything in your smartphone without stuffing your bag.
Sharing gets a lot easier. Group project? Share the same file (you are working on) with your mates without explaining everything in text.
A Step by Step Practical Workflow
Digitization and organization of study materials work best when you follow a consistent process. The given workflow makes the procedure straightforward for you to follow.
Here’s how to proceed:
Decide What to Digitize
First of all, decide which study materials are actually worth keeping in a digital form.
These may include:
Important handwritten notes
Worksheets and practice exercises
Diagrams and illustrations
Reference pages
Assignment materials
You don’t need to digitize every piece of paper. Instead, choose the materials that you feel can be useful in the future for revisions, assignments, projects, or exams.
This will save your digital storage from becoming cluttered with files that hold zero value.
Capture Clear Images of Important Materials
After finalizing which study material really counts, it’s time to digitize it.
In this step, quality matters a lot. A blurry image may be difficult to use later. A cropped image may miss some part of important information. Such mistakes can be troublesome later, especially when you have little time to prepare for exams.
So, to avoid this, digitize them carefully. Before taking a picture, place the material (page) on a flat surface and provide it with good lighting. While capturing the image, make sure that the whole page is visible and the phone camera is well focused.
Try to avoid shadows, reflections, or hands covering any parts of the page.
Taking a little extra care at this step is critical since it becomes the base of your whole process and study experience later.
Convert Images Into Word Documents
Although the important study materials have now been digitized as JPG images, keeping them in a Word document can better suit the organization system.
That’s because Word documents make them far easier to manage. Multiple JPGs can be saved in a single Word file, and they can be accessed virtually on any device. Word documents are also more convenient to share and store.
So, once you have clear images of your study material, convert them into Word documents using an online image to word converter. The main advantage of using an online tool for conversion is that you don’t require any complex setup, nor do you need to download expensive software. An internet connection and a browser are enough.
Also, you don’t need to have any technical knowledge to use such a tool; the process is simple. Here’s what to do:
Open the online converter and upload your image (JPG, PNG, GIF, JFIF, JPEG, or HEIC).
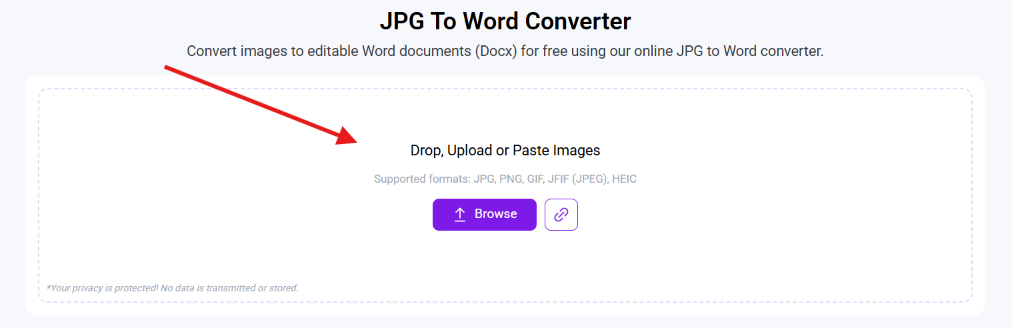
Once it is successfully uploaded, simply click on the “convert” button.
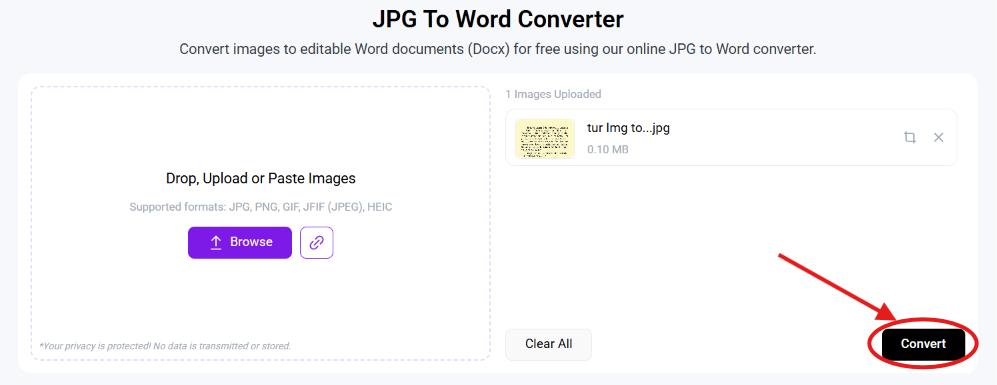
As soon as you click that button, the tool will provide you with the Word file ready to be downloaded (after CAPTCHA verification).

Don’t just blindly save the Word document provided by the converter. Rather, before saving it, review the tool’s output to ensure that the conversion was accurate. If there’s anything missing or incorrect, you may run the conversion process once again (as it takes just a few seconds).
Save the Documents Using a Simple Folder Structure
A good folder structure is one of the most important parts of organizing your digitized study materials. This is because even accurately converted Word files may become difficult to find later if they haven’t been saved properly.
Keep the system simple and logical. You can create one main folder as ‘Study Materials'. Then, create subfolders for each subject in that main folder. After that, save the important files in those subfolders by semester and unit names.
For example:
📁 Study Materials
📁 Biology
📁 Semester 1
📁 Unit 3 – Cell Respiration
📁 History
📁 Semester 1
📁 Unit 2 – Industrial Revolution
Keep in mind that you don’t need to create too many layers of folders. And keep it consistent too. Otherwise, you’ll spend more time clicking through them than studying.
Give Your Files Clear and Searchable Names
Giving the files and folders clear and consistent names is equally important to having an organized folder system. This is one step that either makes or breaks your system.
A file named [IMG_4037.jpg] tells you nothing. In contrast, a file named [Bio_CellRespiration_Diagram_0926.docx] clearly indicates its contents.
You may use this simple format:
Subject_Topic_Type_Date
Examples:
Chem_Stoichiometry_Notes_0912.docx
Econ_SupplyDemand_Chart_0918.docx
Psych_Memory_LectureSlides_0920.docx
A relevant and consistent naming pattern makes searching a lot easier. You may type “stoichiometry” into your computer’s search bar, and the exact file will pop up even two semesters from now.
Back Up Important Study Materials Regularly
Digital files aren’t truly safe until they exist in more than one place. You may follow this simple student version of the 3-2-1 rule:
3 copies of every important study material
2 copies stored on different types of storage or devices
1 copy saved off-site (Google Drive, OneDrive, or Dropbox counts, because even their free tiers offer plenty of space for documents)
Set a weekly reminder to back up your files. It takes five minutes and protects months of valuable work.
Summing Up
Digitizing study materials can make them easier to organize, store, access, and share. However, it’s not about simply creating digital copies. The real benefit lies in converting them into a more suitable format like Word files and creating a consistent organization system.
It's worth noting that this isn’t a one-time giant project. Rather, it’s a repeatable workflow. Decide what matters and digitize it. Then, convert it into Word docs, organize it through a clear folder system, and keep it backed up.
Start with one subject this week. And by midterm, you’ll have a full study resource that goes everywhere you do (without the backpack).